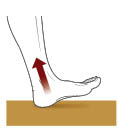
1) Heel strike
Land on the middle of the heel, absorbing initial upward pressure. Your leg should be slightly bent, relaxed, and just in front of your torso. A bent leg alleviates pressure on joints by enabling leg and hip muscles to help absorb impact. Your foot supinates (rotates outward) momentarily for stability as it transitions from heel strike to mid-stance.
Avoid Over-striding Taking giant steps—by flexing your foot and swinging a straight leg far out in front of your torso—can lead to overuse injuries like strained quads and hip bursitis. Shorter steps minimize pounding and muscle exertion, making each stride gentler on the body and more energy efficient, even though you take more steps overall.
|
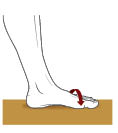
2) Pronation
In this complex movement, the foot rotates slightly to the inside as the arches flatten to distribute pressure over a greater surface area, and your center of gravity moves forward of the foot’s midpoint. Keep your toes pointing forward in the direction of travel. Meanwhile, your opposite foot is in the air and swinging forward.
Avoid Overpronating While your foot should roll slightly inward during the step, if it rolls too far, it can torque your foot and leg, potentially causing pain from heel to hips. Likely causes are flat feet or muscle weakness. Fix the former with supportive insoles, and the latter by strengthening your quads, hip flexors, and hip abductors. Our hiker-specific training plan starts on.
|
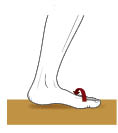
3) Supination
The foot rotates slightly to the outside of the midfoot, allowing the longitudinal arch to absorb shock as your torso aligns above the foot. This phase serves two key purposes: It’s vital for shock absorption and stabilization, and it allows the foot to form a rigid structure for propulsion in preparation for toe-off.
Avoid Forefoot striking Don’t shortchange this important stage by simultaneously striking your heel and forefoot—or by hitting the forefoot before the heel—and eliminating the midfoot phase. Pounding on the forefoot (rather than gradually rocking the foot from back to front) can cause foot and leg problems, including the very painful metatarsalgia. |
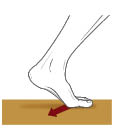
4) Toe-off
As your weight shifts to the opposite heel, your foot becomes a giant lever and you roll over the ball of the foot to the ends of your toes. Use all five toes, gripping the ground for stability and extra propulsion. Your big toe provides the final push off, but the majority of your weight should be shifted to the other leg by this point.
Avoid Shuffling From the toe take-off position, lift your foot behind you as your opposite foot hits the ground. This promotes a nimble, rocking weight transfer rather than a pounding one. Omitting this final toe-off phase (by shuffling or dragging your feet) jars joints from head to toe. Also, avoid pushing off with your toe so forcefully that you bounce, which wastes energy.
|

 1. Glutes and hips Balance standing on one leg (each side) for one minute without assistance.