 Home - Garden
Soldering Copper Pipe
Home - Garden
Soldering Copper Pipe
There's no particular magic required to solder a sweat fitting, though the very presence of a propane torch and hot pipe makes it a procedure that must be done carefully.
-Using the "fittings brush" (or emery cloth), clean inside the fitting to be soldered to the tubing.
-Using emery cloth, clean the outside end of the tubing to be soldered (clean same length of the tubing as will fit into the fitting).
- Using the "flux" brush, apply a thin coat of "flux" on cleaned end of tubing and inside cleaned fitting. Paste flux cleans, fluxes (draws the solder into the fitting), and prevents oxidation as the pipe is heated. It is lead free and can be used on all metals except aluminum and stainless steel. Water-soluble paste flux is ideal for working with supply lines for drinking water.
We recommend tinning flux. It contains a bit of powdered metal alloy that is similar to solder. The alloy melts and coats the inside of the joint and helps ensure a solder joint that’s completely filled and leakproof.
See: Buying Guide: Solders and Flux
- Press the fitting onto the tubing until it "seats".
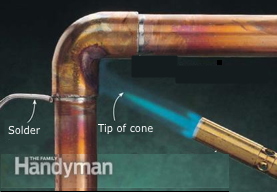 Adjust the torch until the blue part of the flame is about 1 to 2 in. long (this depends somewhat on the type of torch and tip you use).
- Using the lit propane torch, heat the fitting, concentrating the heat (blue tip of the flame) to where you want the solder to "flow to". It also helps to move your torch (i.e., the flame) around the fitting so it heats as evenly as possible all around, thereby ensuring a complete seal all around.
If you heat the joint too long, you’ll burn the flux (it’ll smoke and turn black) and make it difficult to get the solder to flow into the joint.
- As you apply the heat, touch the end of your solder to the tubing (preferrably on the 'opposite' side from where you're applying the heat), just where it comes out of the fitting. When the fitting is hot enough, you'll see the solder melt and be drawn into the joint.
If you overheat the copper, it will oxidize and that prevents the solder from bonding.
When you see the solder fill the joint, remove the heat. Be sure to use enough solder so you see it fill all around the fitting/tubing connection.
Once the joint will take no more solder it will build up outside of the joint and begin to drip.
You should use about 1/2" of solder for 1/2" pipe and 3/4" of flux for 3/4" pipe. Using too much solder will cause burrs inside the joint.
Care should be taken at this point. Disrupting a joint as it cools can result in a dry joint also known as a leak.
- Using the wet rag (with gloves), carefully wipe the joint.
Wash off excess flux after soldering to prevent corrosion.
- Check for leaks after the pipe has cooled.
If the joint leaks, you must open the joint, remove all the solder and start over by cleaning the metal and applying flux. It may be easier to start over with new fittings.
Tools:
                 Good         Cheap if you're not doing a lot
Cut pipe      Pipe Cutter      Hack saw
Deburr        Deburring tool   Flat and round files
Gloves        Welding gloves   Leather work gloves (I put them over a cotton glove)
Links:Tips for Soldering Copper Tubing: It Isn't as Hard as You Might Think! - Yahoo! Voices
How to Solder Copper Pipe - Summary: The Family Handyman
Soldering Copper Pipes | icreatables.comYouTube
Top 5 Reasons Silver Solder Doesn't Flow